Google Search

Google

What is the most suitable distro to use as a server?

Visit Us!

Google Groups
Kuantan Linux User Group
Visit this group

Threat Resource Center | Trend Micro

Sunday, October 7, 2007

XAMPP: Error 1! Couldn't start Apache!

Oppsss, I got this error message when I tried to edit the SSL certificate in XAMPP on my application server. Honestly, it makes me panic! Know what, I can't running the Apache services. When I tried to run the command it shows an error like this

[root@pknp ~]# /opt/lampp/lampp start
Starting XAMPP for Linux 1.5.3a...
XAMPP: Starting Apache with SSL (and PHP5)...
XAMPP: Error 1! Couldn't start Apache!
XAMPP: Starting diagnose...
XAMPP: Sorry, I've no idea what's going wrong.
XAMPP: Please contact our forum http://www.apachefriends.org/f/


I'm searching on the Internet and exactly I've found it from XAMPP website. It said that I need to type the below command:

[root@mybox ~]#tail -2 /opt/lampp/logs/error_log and then it shows what is the type of error

[root@pknp ~]# tail -2 /opt/lampp/logs/error_log
[Sun Oct 07 10:11:52 2007] [error] Unable to configure RSA server private key
[Sun Oct 07 10:11:52 2007] [error] SSL Library Error: 185073780 error:0B080074:x509 certificate routines:X509_check_private_key:key values mismatch

As I expect earlier, it is caused by the SSL editing. I didn't know how this thing happen. 
Maybe there is some misconfigration or the XAMPP version compatibility. When i write this post, I'm using XAMPP for Linux 1.5.3a while the new version is available, XAMPP Linux 1.6.3b. After a few attempt to start the Apache in XAMPP is fail, I was thinking how stupid am I not backup the original certificates files. Now the things come worst. But, I was thinking, Hey, I've got another server (database) that also using XAMPP. Why not I copy that certificate file in that server and replace it back to the original state of my application server.
Fortunately, I still didn't make any configuration to that database server. So, I just copy the files (server.crt and server.key) and replace it to on my application server. 
The I tried to restart the XAMPP back and YESSS!!!! It back on track again. So, the moral is, please BACKUP your original file first before you are going to edit it. 
If not, then it will become a nightmare for you. :-P 


Friday, October 5, 2007

Create A Self-signed SSL Certificate in XAMPP

I have added a plugins for my webmail (Squirrelmail). 
It is Secure Login plugins. 
This plugins enables a secure HTTPS/SSL-encrypted connection
for my SquirrelMail login page. So, it can secure my email access. 
As I'm using Apache in XAMPP, the generated SSL certificate are using the default setting.
When I view the certificate, it show's a default XAMPP Apache setting like below :


Issued To
Common Name (CN)           localhost
Organization (O)               Apache Friends
Organization Unit (OU)      
Serial Number                   00

Issued By
Common Name (CN)           localhost
Organization (O)               Apache Friends
Organization Unit (OU)     


So, to create my own self-signed SSL certificate, I need to edit the certain file make a few tuning. So that, the certificate will be no longer using a default XAMPP setting.

1. Open a terminal/console at local or do it remotely through SSH access


2. The first thing that need to do is, create a RSA Private Key by using the below command.

[root@mybox ~]#openssl genrsa -des3 -out server.key 1024

Generating RSA private key, 1024 bit long modulus
.........................................................++++++
........++++++
e is 65537 (0x10001)
Enter PEM pass phrase: enter the desired pass phrase
Verifying password - Enter PEM pass phrase: same as a above


3. The next step is to create a Certificate Signing Request (CSR). CSR is a message sent from an applicant to a certificate authority in order to apply for a digital identity certificate. User will be prompt to enter an information that related to CSR certificate. To create a CSR, enter the below command.

[root@mybox ~]#openssl req -new -key server.key -out server.csr

Country Name (2 letter code) [GB]:type your 2 letter country code
State or Province Name (full name) [Berkshire]:
type your state or province name
Locality Name (eg, city) [Newbury]:
type your city name
Organization Name (eg, company) [My Company Ltd]:type your company name

Organizational Unit Name (eg, section) []:type your department
Common Name (eg, your name or your server's hostname) []:type your server hostname
Email Address []:
type your email address
Please enter the following 'extra' attributes
to be sent with your certificate request
A challenge password []:
type your password
An optional company name []:
type your company name


4. The next step is to remove the passphrase key. It is because if you enable the passphrase, Apache will ask for the pass-phrase each time the web server is started. It will be a problem if the server is restarted as the user always need to type the passphrase. The below command will remove the passphrase.

[root@mybox ~]#cp server.key server.key.org
[root@mybox ~]#openssl rsa -in server.key.org -out server.key


5. To generating a Self-Signed Certificate, enter the below command. As this certificate is not verified by Certificate Authority such as Thawte or Verisign, your browser will notice an error inform you that the signing certificate authority is unknown and not trusted. Bear in mind that this is self-signed certificate. So, you should ignore that error message.

[root@mybox ~]#openssl x509 -req -days 365 -in server.csr -signkey server.key -out server.crt


6. Installing the Private Key and Certificate is simple. All you need to do is to know where are your XAMPP Apache directory. I assume that, we are using the default XAMPP directory, /opt/lampp. So, copy the two below files, ssl.crt and ssl.key to the XAMPP directory.

[root@mybox ~]#cp server.crt /opt/lampp/etc/ssl.crt
[root@mybox ~]#cp server.key /opt/lampp/etc/ssl.key/server.key

When you are being asked to overwritten the file, just type yes and hit Enter.


7.
Restart Apache and test to access your site. Check the certificate and make sure the information that you have insert is correct.


8.
Finish! Your configuration is done. Good luck :-)


Monday, September 17, 2007

Linux Intrusion Discovery

THIS GUIDE IS TAKEN FROM SANS INSTITUTE

Purpose
System Administrators are often on the front lines of computer security. This guide aims to support System Administrators in finding indications of a system compromise.

What to use this sheet for
On a periodic basis (daily, weekly, or each time you
logon to a system you manage,) run through these
quick steps to look for anomalous behavior that
might be caused by a computer intrusion. Each of
these commands runs locally on a system.
This sheet is split into these sections:
• Unusual Processes
• Unusual Files
• Unusual Network Usage
• Unusual Scheduled Tasks
• Unusual Accounts
• Unusual Log Entries
• Additional Supporting Tools


• Unusual Processes
Look for running processes:
# ps –aux
Get familiar with “normal” processes for the machine.
Look for unusual processes. Focus on processes with
root (UID 0) privileges.
If you spot a process that is unfamiliar, investigate
unusual processes, getting more detail using:
# lsof –p [pid]
This command shows all files and ports used by the
running process.

• Unusual Files
Look for unusual SUID root files:
# find / -uid 0 –perm -4000 –print
Requires knowledge of normal SUID files
Look for unusual large files (greater than 10
MegaBytes):
# find / -size +10000k –print
Requires knowledge of normal large files
Look for files named with dots and spaces:
(“...”, “.. “, “. “, and “ “)
# find / -name “...“ –print
# find / -name “.. “ –print
# find / -name “. “ –print

On a Linux machine with RPM installed (RedHat,
Mandrake, etc.), run the RPM tool to verify packages
# rpm –Va
Checks size, MD5 sum, permissions, type, owner, and
group of each file with information from RPM
database
Output includes:
S – File size differs
M – Mode differs (permissions)
5 – MD5 sum differs
D – Device number mismatch
L – readLink path mismatch
U – user ownership differs
G – group ownership differs
T – modification time differs
Pay special attention to changes associated with
items in /sbin, /bin, /usr/sbin, and /usr/bin


• Unusual Network Usage
Look for promiscuous mode, which might indicate a
sniffer:
# ip link | grep PROMISC
Note that ifconfig doesn’t work reliably for detecting
promiscuous mode on Linux kernel 2.4

Look for unusual port listeners:
# lsof –i
# netstat –nap
Need to know which TCP and UDP ports are
normally listening on your system and look for
deviations from the norm

Look for unusual ARP entries, mapping IP address to
MAC addresses that aren’t correct for the LAN:
# arp –a
Requires detailed knowledge of what is supposed to
be on the LAN


• Unusual Scheduled Tasks
Look for cron jobs scheduled by root and any other
UID 0 accounts:
# crontab –u root –l
Look for unusual system-wide cron jobs:
# cat /etc/crontab


• Unusual Accounts
Look in /etc/passwd for new accounts, especially
with UID 0 or GID 0
# less /etc/passwd
# grep :0: /etc/passwd
Normal accounts will be there, but look for new,
unexpected accounts


• Unusual Log Entries
Look through your system log files for suspicious
events, including:
Promiscuous mode
“entered promiscuous mode”
Large number of authentication or login
failures from either local or remote access
tools (e.g., telnetd, sshd, etc.)
Remote Procedure Call (rpc) programs with a
log entry that includes a large number (> 20)
strange characters (-^PM-^PM-^PM-^PM-
^PM-^PM-^PM-^PM)
For web servers: Large number of Apache
logs saying “error”


• Additional Supporting Tools
The following tools are often not built into
Linux operating system, but can be used to
analyze its security status in more detail.
Each is available for free download at the
listed web site.
Chkrootkit looks for anomalies on systems
introduced by user-mode and kernel-mode
RootKits
www.chkrootkit.org - free
Tripwire looks for changes to critical system
files
www.tripwire.org - free for Linux for noncommercial
use
AIDE looks for changes to critical system files
http://www.cs.tut.fi/~rammer/aide.html

Wednesday, August 22, 2007

How to change network setting in Linux

I'm having a problem to access to my desktop using GUI. So, I decided to use command in console. I would like to share with people especially newbies how to configure Linux network using a command prompt based on my experience.

1. [root@localhost ~]#ifconfig eth0 172.20.30.30 netmask 255.255.255.0 up
2. [root@localhost ~]#route add default gw 172.20.30.254

Monday, August 13, 2007

How to disabling the Ctrl+Alt+Delete in Linux console

As usual, I'm coming to office and entering the server room and login to the portal to check in for my attendance system. But all of the sudden, the server is restart!!!! Oh my god! I was accidentally press the Ctrl+Alt+Delete!!! What I have done? Than, I tried to fix the problem. The solution that I can do is I need to disable the Ctrl+Alt+Delete key. I'm afraid that if anyone that accidentally press that key than everything will be horror. To disable that key is quiet simple actually. Below are the steps that I have done.

1. Backup the original etc/inittab file and named it as a inittab.ori
[root@localhost ~]# cp /etc/inittab /root/Desktop/backup/inittab.ori

2. Edit the original file in /etc/inittab
[root@localhost ~]#vi /etc/inittab

3. Find the the # Trap CTRL-ALT-DELETE line
You can see that there is a file that exactly look like this
ca::ctrlaltdel:/sbin/shutdown -t3 -r now

4. Now edit that line such below
ca:12345:ctrlaltdel:/bin/echo "CTRL-ALT-DEL is disabled"

5. Save the file that you have edit and quit from VI

6. In order to activate the changes, you need to run this command
[root@localhost ~]# init q

7. After that to make sure it is effective or not, try to press the Ctrl+Alt+Del key. Your screen should appear "CTRL-ALT-DEL is disabled"

8. Done :-)

Wednesday, May 2, 2007

Installing Internet Explorer on Fedora Core 6

After installing Fedora Core 6 on my notebook, i was thinking and curious to try to install Internet Explorer on this distro to see how it works. To make it happen, all we need to do is to get wine and and cabextract file. To get this two files, we need to use yum to download both of it.

1. Open Terminal, make sure you are root. Type : yum -y install wine*


2. Finish downloading installing wine files


3. After installing the wine, the next step is to yum the cabextract. Type the command : yum -y install cabextract


4. Get the ie4slinux file using wget command.
wget http://www.tatanka.com.br/ies4linux/downloads/ies4linux-latest.tar.gz


5. Then, untar the ies4linux-latest.tar.gz file using this command : tar zxvf ies4linux-latest.tar.gz

6. You will be asked a few question regarding the Internet Explorer installation. Just follow the instruction.


7. The related file will be downloaded and the installation will be run automatically.


8. There should be no problem at all when you are reaching this step unless in a certain situation you are facing problem. Thank god, the installation is finish.... :-) After this step, what you need to do is type this command : ie6 and hit Enter


9. Finally, the Internet Explorer is on your Linux distro. The congratulation page will be appear to tell that your installation are successful. There are also a Internet Explorer icon at your desktop. Just click it to use it.


10. The Internet Options are still like on Windows. Surfing until die.... ;-p

Sick of viewing the too many Windows? Check this out


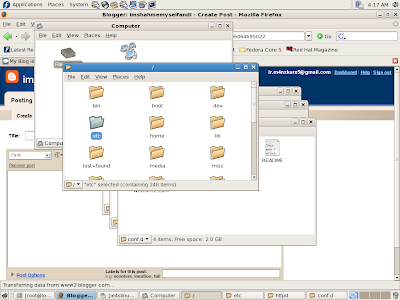
When using GUI to open up a file, sometimes it will make you feel dizzy. Why? Because multiple windows will appear. Imagine, you just want to view httpd.conf file but on your desktop, there are many windows appear. All you need to do is just follow this very simple step :

1. Open Computer
2. Click on Edit > Preferences
3. Behavior > Choose Always open in browser windows > Close
4. Try to re-open back the directory
5. No multiple windows on your desktop anymore
6. Have a nice day!!! :-)

Thursday, April 19, 2007

MAMPU-OSCC (Open Source Competency Centre)

What is OSCC ?

OSCC is stand for Open Source Competency Centre and it is a part of MAMPU (Malaysia Administration and Modenisation Planning Unit). MAMPU is one of the government agency under Malaysia government. OSCC are providing a services that based on a Open Source. It is responsible to make an implementation of open source software in a government sector. OSSC are offering a lot of benefits to civil servant that working especially in a IT field. One of the best thing is they are offering a FREE fees training cost. :-) If you seat for Linux Fundamental training at the any training provider, at least you need to spend RM thousand. But, at OSCC you don't need to think about fees.


Me At OSCC

I'm one of the lucky person i guess chosen to attend the Linux Fundamental courses at OSCC on 17 April - 18 April 2007. It is not easy to be invited because there are so many government staff out there waiting for their turn. The two days course give a lot of information to the trainee, meet new friends and so on. The facilities are good, with the HP Compaq dc7700 CMT and powered by Ubuntu 7.04 64bit (Feisty Fawn), it is a very good experience and exposure for me to improve my skills and knowledge.


Wednesday, April 18, 2007

MC - Midnight Commander

What is Midnight Commander?

DESCRIPTION
GNU Midnight Commander is a directory browser/file manager for Unix-like operating systems.

I'm learning something new during my training at OSCC. It is Midnight Commander a Linux file browser. Basically, it seems like Windows Explorer but the interface is less icon and less graphical look compared to Windows Explorer. To use MC, you can just use the given function key F1 until F9. Even, it's more to command line look, user still can use mouse to use it. Easy huh? Really2 easy la i can say. :)


Install MC if it is not installed yet on your machine. How to install? It's simple. I'm using Ubuntu when I'm write this post.


GUI installation
System > Administration > Synaptic Package Manager > Search type MC > Double click MC > Install

Command line installation
root@training20-desktop:/home# apt-get install mc

DONE!

Saturday, April 14, 2007

My Linux server won't display anything!

I'm back on my duty after a week spending my time to prepared for my examination. I was shock when i see there's no display appear at my Linux server monitor. Where did the desktop go?? I have experienced this things but the thing i do is just reboot the server. [root@db~]# init 6 then everthing is back on normal. But this time i will never ever doing that way. I will try to find how can i fix such problem and yes Internet are the most total solution for you.

1. I try to ping my webserver from db server and it's alive
2. SSH to my webserver using root account
3. Enter this command
[root@apps ~]# ps aux | grep 'cat /tmp/.X0-lock'
4. Then it appear such message
root 4856 0.0 0.0 3912 692 pts/4 S+ 11:44 0:00 grep cat /tmp.x0-lock
5. Enter this command
[root@apps ~]# start --x:1
6. And the display on my webserver is back again!

ProZilla for Linux

ProZilla - Linux File Download Accelarator

I was searching on the net and found this software. Great! It's for Linux. So, i have install it on my Linux server. I'm using yum to install it. After the installation is finished, then i try to use this software. See what this download accelerator can do. There are no complex configuration that you need to do. All you need to do, is just enter a few easy command based on the given manual on ProZilla website. I'm using a command line base ProZilla . There are also another ProZilla version that called ProzGUI. This type of ProZilla are using graphical interface. For me, i do prefer use command line as it can improve my skills on mastering the command line. I have tried to remotely (SSH) download the AVG 7.5 from Grisoft (avg75free_446a991.exe) using ProZilla.


ProZilla Usage

1. Open a linux terminal

2. Enter this syntax : proz See the example below

[root@localhost ~]# proz http://free.grisoft.com/softw/70free/setup/avg75free_446a991.exe


3. Press Enter and then the file will be downloaded to your machine. The below screen shows
how the download accelarator works.


This below are the ProZilla information on my server

[root@localhost ~]# rpm -qi prozilla
Name : prozilla Relocations: (not relocatable)
Version : 2.0.4 Vendor: Fedora Project
Release : 7.fc5 Build Date: Tue 02 Jan 2007 07:28:32 AM MYT
Install Date: Fri 30 Mar 2007 04:37:15 PM MYT Build Host: hammer2.fedora.redhat.com
Group : Applications/Internet Source RPM: prozilla-2.0.4-7.fc5.src.rpm
Size : 297098 License: GPL
Signature : DSA/SHA1, Thu 04 Jan 2007 04:49:46 PM MYT, Key ID 82ed95041ac70ce6
Packager : Fedora Project
URL : http://prozilla.genesys.ro/
Summary : Advanced Linux download manager
Description :
ProZilla is a download accellerator program written for Linux to speed
up the normal file download process. It often gives speed increases of
around 200% to 300%. It supports both FTP and HTTP protocols, and the
theory behind it is very simple.

The program opens multiple connections to a server, and each of the
connections downloads a part of the file, thus defeating existing
internet congestion prevention methods which slow down a single
connection based download.

ProZilla also supports file download resuming, and ftpsearch for
fastest ping times.


Linux News Of The Day!

Powered By
widgetmate.com
Sponsored By
Credit Card Forum