Google Search

Google

What is the most suitable distro to use as a server?

Visit Us!

Google Groups
Kuantan Linux User Group
Visit this group

Threat Resource Center | Trend Micro

Monday, October 19, 2009

Unix Tutorial For Dummies Like Me :-)

CPU / Memory

1. HPUX

2. AIX

3. Solaris

4. Linux

5. Tru64


HPUX

How to check CPU/Memory usage


# glance OR top OR vmstat OR iostat OR sar

## to check CPU/Memory utilisation


· Find large processes which currently filled up the CPU/Memory usage.


AIX

How to check CPU/Memory usage:


# sar OR vmstat OR iostat OR topas ## to check CPU/Memory utilisation


· Find large processes which currently filled up the CPU/Memory usage.


SOLARIS

How to check CPU/Memory usage:


# sar OR vmstat OR iostat ## to check CPU/Memory utilisation


· Find large processes which currently filled up the CPU/Memory usage.


LINUX

How to check CPU/Memory usage:


# sar OR vmstat OR iostat OR top ## to check CPU/Memory utilisation


· Find large processes which currently filled up the CPU/Memory usage.


TRU64


How to check CPU/Memory usage:


# vmstat OR iostat OR top ## to check CPU/Memory utilisation


· Find large processes which currently filled up the CPU/Memory usage.


HPUX

How to check disk space: (using /var as example)


# bdf /var ## to check disk utilisation for /var filesystem

# find /var -xdev -type f -size +5000000c -exec ls -l {} \; | sort -nk 5 ## to find larger files in /var


AIX, SOLARIS, LINUX, TRU64


How to check disk space:


# df -k /var ## to check disk utilisation for /var filesystem

# find /var -xdev -type f -size +5000000c -exec ls -l {} \; | sort -nk 5 ## to find larger files in /var


HPUX/AIX/SOLARIS/LINUX/TRU64

Pre-checking before reboot


Capture the system details

# bdf > /tmp/bdf.txt ## For HPUX

OR

# df –k > /tmp/df.txt ## For other OS

# netstat –in > /tmp/netstat.in.txt

# netstat –rn > /tmp/netstat.rn.txt

# lanscan > /tmp/lanscan.txt ## For HPUX

# ioscan –fn > /tmp/ioscan.txt ## For HPUX

# ps –ef | grep –i sap ## Double confirm no SAP running

# ps –ef | grep –I oracle ## Double confirm no Database running


How to reboot server

# shutdown [-option] [ +Time [ Message ] ] ## man shutdown to find more the option


Account Creation

# finger

OR

# grep –i <> /etc/passwd


HPUX/AIX/SOLARIS/LINUX/TRU64


# useradd –c -g -m –d -s id

## man useradd for more the option


AIX


# mkuser ## man mkuser for more the option


Account Mod

Do initial checking on the account


# finger

OR

# grep –i <> /etc/passwd


HPUX/SOLARIS/LINUX/TRU64


# usermod ## man usermod for more the option


AIX


# chuser ## man chuser for more the option


Account Deletion

Do initial checking on the account


# finger

OR

# grep –i <> /etc/passwd

HPUX/SOLARIS/LINUX/TRU64


# userdel –r ## man userdel for more the option


AIX


# rmuser ## man rmuser for more the option


Generic Process to add printer

1) Confirm details provided (such as printer queue name, IP address and model).

2) Perform initial checking:-


# ping ## Ping new printer IP address

# lpstat –o ## Verify if printer queue used up


Issue following command to create print queue.

# hppi or sam ## HP UX

# smitty ## IBM


Generic Process to modify printer:

1) Confirm details provided (such as printer queue name, IP address and model).

2) Perform initial checking:-


HPUX

# ping ## Ping new and old printer IP address

# lpstat –o ## Verify printer queue

# grep –i model /etc/lp/interface ## Check printer model

# grep –i periph /etc/lp/interface ## Check printer IP

# grep –i /etc/hosts ## Check printer IP

IBM

# Smitty


Issue following command to modify printer queue IP or model. Printer modify can be do anytime.


HPUX

# vi /etc/lp/interface ## Change network printer IP only


**To modify printer model, remove old print queue and recreate with new model.

**If print queue are remote printer, remove old print queue and recreate with new IP or model.


IBM

**Remove old print queue and recreate with new IP or model


Generic Process to delete printer:

1) Confirm details provided (such as printer queue name, IP address and model).

2) Perform initial checking:-


HPUX/IBM/SUN SOLARIS/Linus/Tru64

# ping ## Ping new and old printer IP address

# lpstat –o ## Verify printer queue


Issue following command to delete printer queue IP or model.


HPUX

# hppi or sam


IBM

# smitty
Thursday, June 4, 2009

Using nmap for Linux administration and security

This articles is taken from here

In this tip we are going to learn about nmap, an open source network scanner that is ideal for network troubleshooting, scanning, and auditing. The tool can be used to identify devices on the network as well as the services running on the particular devices. Additionally, advanced information such as operating systems in use, particular services (name and version), and network filters and firewalls can be identified.

The identification of services with nmap is achieved through its fingerprint database that currently contains 5,000+ fingerprints. This database is supported by the community by allowing submission of known fingerprints.


Nmap as an inventory tool
One of the common applications of nmap is to generate basic inventory reports. This is useful for network maps, renewal of maintenance agreements on network devices and nodes, and to identify rogue, unauthorized, or forgotten devices.
The basic scan for an inventory makes use of a ping scan. For example, the following scan shows the host available on the 192.168.1.0/24 network. The -sP tells nmap to do a ping scan, and the -n says to not do name resolution.

nmap -sP -n 192.168.1.0/24
Starting Nmap 4.76 (http://nmap.org) at 2009-05-14 10:18 CDT
Host 192.168.1.1 appears to be up.
MAC Address: 00:18:3A:A4:43:BA (Westell Technologies)
Host 192.168.1.2 appears to be up.
Host 192.168.1.3 appears to be up.
MAC Address: 00:17:EE:01:95:19 (Motorola CHS)
Host 192.168.1.4 appears to be up.
MAC Address: 00:16:CB:A3:27:E4 (Apple Computer)
Host 192.168.1.5 appears to be up.
MAC Address: 00:1E:52:7D:84:7E (Apple)
Nmap done: 256 IP addresses (5 hosts up) scanned in 2.17 seconds

This ping scan is quite useful for building inventories quickly. It can also be the building blocks of more sophisticated scripts and programs to validate adds and changes to the network. For example, the following command reports the new host (192.168.1.5) on the network from two daily scans output to text files:

diff monday.scan tuesday.scan | grep "> Host"
> Host 192.168.1.5 appears to be up.


Host-specific inventory
To look at a particular host to determine services running, you can use nmap. For example, let's take a closer look at the 192.168.1.5 that appears to have been turned up sometime after the Monday scan but before the Tuesday scan:

nmap -n 192.168.1.5
Starting Nmap 4.76 ( http://nmap.org ) at 2009-05-14 12:44 CDT
Interesting ports on 192.168.1.5:
Not shown: 984 closed ports
PORT STATE SERVICE
22/tcp open ssh
88/tcp open kerberos-sec
111/tcp open rpcbind
139/tcp open netbios-ssn
445/tcp open microsoft-ds
515/tcp open printer
548/tcp open afp
631/tcp open ipp
1021/tcp open unknown
1022/tcp open unknown
1023/tcp open netvenuechat
2049/tcp open nfs
3300/tcp open unknown
5900/tcp open vnc
20221/tcp open unknown
20222/tcp open unknown
MAC Address: 00:16:CB:A3:27:E4 (Apple Computer)
Nmap done: 1 IP address (1 host up) scanned in 10.46 seconds
It appears to be a Unix based system based upon ssh, but the identification of the MAC address makes the system most likely an Apple Mac computer. But, a closer look using nmap's service and version detection, more information can be gleaned. The -sV parameter is used for this:

mb3:~ root# nmap -n -sV 192.168.1.5
Starting Nmap 4.76 ( http://nmap.org ) at 2009-05-14 12:47 CDT
Interesting ports on 192.168.1.5:
Not shown: 984 closed ports
PORT STATE SERVICE VERSION
22/tcp open ssh OpenSSH 5.1 (protocol 1.99)
88/tcp open kerberos-sec Mac OS X kerberos-sec
111/tcp open rpcbind
139/tcp open netbios-ssn Samba smbd 3.X (workgroup: WORKGROUP)
445/tcp open netbios-ssn Samba smbd 3.X (workgroup: WORKGROUP)
515/tcp open printer
548/tcp open afp?
631/tcp open ipp CUPS 1.3
1021/tcp open rpcbind
1022/tcp open rpcbind
1023/tcp open rpcbind
2049/tcp open rpcbind
3300/tcp open unknown?
5900/tcp open vnc VNC (protocol 3.8)
20221/tcp open unknown?
20222/tcp open unknown?
1 service unrecognized despite returning data.
If you know the service/version, please submit the following fingerprint
at http://www.insecure.org/cgi-bin/servicefp-submit.cgi :
SF-Port548-TCP:V=4.76%I=7%D=5/14%Time=4A0C5929%P=i386-apple-darwin9.4.0%r(
SF:SSLSessionReq,172,"\x01\x03\0\0Q\xec\xff\xff\0\0\x01b\0\0\0\0\0\x18\0\"
AD9
SF:6FA5112ED039C\0\x04mini");
MAC Address: 00:16:CB:A3:27:E4 (Apple Computer)
Service Info: OS: Mac OS X
Host script results:
| Discover OS Version over NetBIOS and SMB: Unix
|_ Discover system time over SMB: 2009-05-14 12:49:02 UTC-5
Service detection performed. Please report any incorrect results at http://nmap.org/submit/ .
Nmap done: 1 IP address (1 host up) scanned in 119.68 seconds

Now the administrator knows that it is Mac OS X, and that it is being used for Windows file sharing using Samba, that it is most likely sharing printers via CUPS, and that the system is configured for remote management with virtual network computing (VNC).


Using nmap for security
While nmap is quite useful for administrators as shown above, it is also quite powerful for security audits. For example, many companies do not allow Web servers to be run on user networks (i.e. networks where user computers and laptops are connected). nmap can easily be used to identify all the systems with Web services running on the well known ports of 80 and 443 with:

nmap -n -p 80,443 192.168.1.0/24 | egrep "ports|open"
Interesting ports on 192.168.1.1:
80/tcp open http
443/tcp open https
Interesting ports on 192.168.1.2:
Interesting ports on 192.168.1.3:
Interesting ports on 192.168.1.4:
Interesting ports on 192.168.1.5:

Another useful feature is identifying particular versions to determine if systems are vulnerable to an announced vulnerability. For example, let's assume the Samba team has announced a security issue with a particular version of Samba, and you need to identify all your Samba versions. The following reports the Samba versions:

nmap -n -sV -p 139 192.168.1.0/24 | egrep "ports|139"
Interesting ports on 192.168.1.1:
139/tcp closed netbios-ssn
Interesting ports on 192.168.1.2:
139/tcp closed netbios-ssn
Interesting ports on 192.168.1.3:
139/tcp filtered netbios-ssn
Interesting ports on 192.168.1.4:
139/tcp open netbios-ssn Samba smbd 3.2 (workgroup: HQ)
Interesting ports on 192.168.1.5:
139/tcp open netbios-ssn Samba smbd 2.1 (workgroup: REMOTE)
Interesting ports on 192.168.1.15:
139/tcp open netbios-ssn Samba smbd 3.2 (workgroup: WORKGROUP)

This tip has shown how nmap can be used for network inventory scans (-sP), more thorough inventory and auditing, and security scans to identify unauthorized services as well as assist in security vulnerability assessments. nmap is a good tool to have readily available...combine it with grep or egrep and it becomes a powerful reporting tool.

How to check Ubuntu version

There are a few command to check the Ubuntu version. See below.

Command : lsb_release -a
root@ubuntu:~# lsb_release -a
No LSB modules are available.
Distributor ID: Ubuntu
Description: Ubuntu 8.10
Release: 8.10
Codename: intrepid

Command : cat /etc/issue
root@ubuntu:~# cat /etc/issue
Ubuntu 8.10 \n \l

Command : cat /etc/lsb-release
root@ubuntu:~# cat /etc/lsb-release
DISTRIB_ID=Ubuntu
DISTRIB_RELEASE=8.10
DISTRIB_CODENAME=intrepid
DISTRIB_DESCRIPTION="Ubuntu 8.10"

Command : cat /etc/apt/sources.list
root@ubuntu:~# cat /etc/apt/sources.list
#
# deb cdrom:[Ubuntu-Server 8.10 _Intrepid Ibex_ - Release amd64 (20081028.1)]/ intrepid main restricted

#deb cdrom:[Ubuntu-Server 8.10 _Intrepid Ibex_ - Release amd64 (20081028.1)]/ intrepid main restricted
# See http://help.ubuntu.com/community/UpgradeNotes for how to upgrade to
# newer versions of the distribution.

deb http://my.archive.ubuntu.com/ubuntu/ intrepid main restricted
deb-src http://my.archive.ubuntu.com/ubuntu/ intrepid main restricted

## Major bug fix updates produced after the final release of the
## distribution.
deb http://my.archive.ubuntu.com/ubuntu/ intrepid-updates main restricted
deb-src http://my.archive.ubuntu.com/ubuntu/ intrepid-updates main restricted

## N.B. software from this repository is ENTIRELY UNSUPPORTED by the Ubuntu
## team. Also, please note that software in universe WILL NOT receive any
## review or updates from the Ubuntu security team.
deb http://my.archive.ubuntu.com/ubuntu/ intrepid universe
deb-src http://my.archive.ubuntu.com/ubuntu/ intrepid universe
deb http://my.archive.ubuntu.com/ubuntu/ intrepid-updates universe
deb-src http://my.archive.ubuntu.com/ubuntu/ intrepid-updates universe

## OpenNMS
deb http://debian.opennms.org stable main
deb-src http://debian.opennms.org stable main

## N.B. software from this repository is ENTIRELY UNSUPPORTED by the Ubuntu
## team, and may not be under a free licence. Please satisfy yourself as to
## your rights to use the software. Also, please note that software in
## multiverse WILL NOT receive any review or updates from the Ubuntu
## security team.
deb http://my.archive.ubuntu.com/ubuntu/ intrepid multiverse
deb-src http://my.archive.ubuntu.com/ubuntu/ intrepid multiverse
deb http://my.archive.ubuntu.com/ubuntu/ intrepid-updates multiverse
deb-src http://my.archive.ubuntu.com/ubuntu/ intrepid-updates multiverse

## Uncomment the following two lines to add software from the 'backports'
## repository.
## N.B. software from this repository may not have been tested as
## extensively as that contained in the main release, although it includes
## newer versions of some applications which may provide useful features.
## Also, please note that software in backports WILL NOT receive any review
## or updates from the Ubuntu security team.
# deb http://my.archive.ubuntu.com/ubuntu/ intrepid-backports main restricted universe multiverse
# deb-src http://my.archive.ubuntu.com/ubuntu/ intrepid-backports main restricted universe multiverse

## Uncomment the following two lines to add software from Canonical's
## 'partner' repository. This software is not part of Ubuntu, but is
## offered by Canonical and the respective vendors as a service to Ubuntu
## users.
# deb http://archive.canonical.com/ubuntu intrepid partner
# deb-src http://archive.canonical.com/ubuntu intrepid partner

# Line commented out by installer because it failed to verify:
#deb http://security.ubuntu.com/ubuntu intrepid-security main restricted
# Line commented out by installer because it failed to verify:
#deb-src http://security.ubuntu.com/ubuntu intrepid-security main restricted
# Line commented out by installer because it failed to verify:
#deb http://security.ubuntu.com/ubuntu intrepid-security universe
# Line commented out by installer because it failed to verify:
#deb-src http://security.ubuntu.com/ubuntu intrepid-security universe
# Line commented out by installer because it failed to verify:
#deb http://security.ubuntu.com/ubuntu intrepid-security multiverse
# Line commented out by installer because it failed to verify:
#deb-src http://security.ubuntu.com/ubuntu intrepid-security multiverse

Installing nmap in Ubuntu

I want to using nmap in my Ubuntu server but I found that nmap is not installed yet.
root@ubuntu:~# nmap
The program 'nmap' is currently not installed. You can install it by typing:

So, to install nmap just type the below command. It is extremely simple and easy :)
type this command : apt-get install nmap
-bash: nmap: command not found
root@ubuntu:~# apt-get install nmap
** nmap will be installed and the below process will be shown
Reading package lists... Done
Building dependency tree
Reading state information... Done
The following NEW packages will be installed:
nmap
0 upgraded, 1 newly installed, 0 to remove and 46 not upgraded.
Need to get 1080kB of archives.
After this operation, 3789kB of additional disk space will be used.
Get:1 http://my.archive.ubuntu.com intrepid/main nmap 4.62-1ubuntu1 [1080kB]
Fetched 1080kB in 20s (52.4kB/s)
Selecting previously deselected package nmap.
(Reading database ... 53517 files and directories currently installed.)
Unpacking nmap (from .../nmap_4.62-1ubuntu1_amd64.deb) ...
Processing triggers for man-db ...
Setting up nmap (4.62-1ubuntu1) ...

taddaaaaaaa...!!!! Nmap is installed..Yeaaaaa
root@ubuntu:~# nmap
Nmap 4.62 ( http://nmap.org )
Usage: nmap [Scan Type(s)] [Options] {target specification}
TARGET SPECIFICATION:
Can pass hostnames, IP addresses, networks, etc.
Ex: scanme.nmap.org, microsoft.com/24, 192.168.0.1; 10.0.0-255.1-254
-iL : Input from list of hosts/networks
-iR : Choose random targets
--exclude : Exclude hosts/networks
--excludefile : Exclude list from file
HOST DISCOVERY:
-sL: List Scan - simply list targets to scan
-sP: Ping Scan - go no further than determining if host is online
-PN: Treat all hosts as online -- skip host discovery
-PS/PA/PU [portlist]: TCP SYN/ACK or UDP discovery to given ports
-PE/PP/PM: ICMP echo, timestamp, and netmask request discovery probes
-PO [protocol list]: IP Protocol Ping
-n/-R: Never do DNS resolution/Always resolve [default: sometimes]
--dns-servers : Specify custom DNS servers
--system-dns: Use OS's DNS resolver
SCAN TECHNIQUES:
-sS/sT/sA/sW/sM: TCP SYN/Connect()/ACK/Window/Maimon scans
-sU: UDP Scan
-sN/sF/sX: TCP Null, FIN, and Xmas scans
--scanflags : Customize TCP scan flags
-sI : Idle scan
-sO: IP protocol scan
-b : FTP bounce scan
--traceroute: Trace hop path to each host
--reason: Display the reason a port is in a particular state
PORT SPECIFICATION AND SCAN ORDER:
-p : Only scan specified ports
Ex: -p22; -p1-65535; -p U:53,111,137,T:21-25,80,139,8080
-F: Fast mode - Scan fewer ports than the default scan
-r: Scan ports consecutively - don't randomize
--top-ports : Scan most common ports
--port-ratio : Scan ports more common than
SERVICE/VERSION DETECTION:
-sV: Probe open ports to determine service/version info
--version-intensity : Set from 0 (light) to 9 (try all probes)
--version-light: Limit to most likely probes (intensity 2)
--version-all: Try every single probe (intensity 9)
--version-trace: Show detailed version scan activity (for debugging)
SCRIPT SCAN:
-sC: equivalent to --script=safe,intrusive
--script=: is a comma separated list of
directories, script-files or script-categories
--script-args=: provide arguments to scripts
--script-trace: Show all data sent and received
--script-updatedb: Update the script database.
OS DETECTION:
-O: Enable OS detection
--osscan-limit: Limit OS detection to promising targets
--osscan-guess: Guess OS more aggressively
TIMING AND PERFORMANCE:
Options which take

Monday, May 25, 2009

INVITATION TO PARTICIPATE IN MSC MALAYSIA OPEN SOURCE CONFERENCE 2009

Date: 31 May - 3 June, 2009
Venue: Berjaya Times Square Hotel & Convention Center, Kuala Lumpur.

MSC Malaysia's inaugural and full-fledged Open Source Conference to incorporate a "Quadruple play" of 4 crucial stakeholders consisting of government, businesses, developers and community in envisioning open source's contribution to the IT industry and socio-economy.

Positioned as International forum for sharing and exchanging ideas on technical advancements, applications, development and business cases on open source, and its positive impact in meeting challenges of the current economic climate.

Organised by MSC Malaysia in cooperation with the Malaysian Administrative Modernisation and Management Planning Unit (MAMPU), the annual MSC Malaysia OSCONF is also supported by the Malaysian Open Source community. This event complements the annual Malaysian Government Open Source Software Conference (MyGOSSCON) as the premier platform for all things Open Source in Malaysia.

With 3 DAYS, 3 TRACKS, 1 HACKATHON are in store for everyone who attend this conference. In addition, we have renowned speakers from prime Open Source Enterprises which are Mozilla, Google and Red Hat to name a few and also not forgeting from the developer community - Ubuntu, BSD, Fedora, PHPs, etc

Come join us at the MSC Malaysia Open Source Conference 2009! You'll be pleasantly surprised...

Who should attend?
  • Business executives from MSC Malaysia and Non-MSC Malaysia Status companies
  • Open Source developers, communities, inventors, evangelist, researchers, strategist
  • Government officers
  • Students, general public
Why you should attend?
  1. Provide exposure and knowledge on the importance of Open Source in enhancing competitiveness by giving freedom of choice in software usage with lower total cost of ownership, hence benefiting businesses and society at large. Over 30 session tracks are made available.
  2. Share amongst the open source community on new directions and latest innovations by the subject matter experts, thought leaders and industry gurus.
  3. Provide a platform for conference participants to actively interact, share and exchange views, ideas, and tools on the latest trends and issues of Open Source.
  4. Networking, learning and having great fun! Click here for more details


REGISTER NOW!!!

Wednesday, May 13, 2009

How to create a website statistic using AWSTATS

This post is based on my experience on setup and configuring the Awstats. configuration. I'm installing it on my Ubuntu server 8.10.


Step 1

Access to AWSTATS server by using SSH protocol.

IP address: 192.168.19.50

loginname: awstats

password: ********

awstats@ubuntu:~$ type cd /var/www/awstats/tools/


Step 2

awstats@ubuntu:/var/www/awstats/tools$ type ls

awstats_buildstaticpages.pl awstats_updateall.pl maillogconvert.pl xslt

awstats_configure.pl httpd_conf urlaliasbuilder.pl

awstats_exportlib.pl logresolvemerge.pl webmin


Step 3

awstats@ubuntu:/var/www/awstats/tools$ sudo ./awstats_configure.pl

[sudo] password for awstats:

----- AWStats awstats_configure 1.0 (build 1.8) (c) Laurent Destailleur -----

This tool will help you to configure AWStats to analyze statistics for

one web server. You can try to use it to let it do all that is possible

in AWStats setup, however following the step by step manual setup

documentation (docs/index.html) is often a better idea. Above all if:

- You are not an administrator user,

- You want to analyze downloaded log files without web server,

- You want to analyze mail or ftp log files instead of web log files,

- You need to analyze load balanced servers log files,

- You want to 'understand' all possible ways to use AWStats...

Read the AWStats documentation (docs/index.html).

-----> Running OS detected: Linux, BSD or Unix

Warning: AWStats standard directory on Linux OS is '/usr/local/awstats'.

If you want to use standard directory, you should first move all content

of AWStats distribution from current directory:

/var/www/awstats

to standard directory:

/usr/local/awstats

And then, run configure.pl from this location.

Do you want to continue setup from this NON standard directory [yN] ? press y

-----> Check for web server install

Enter full config file path of your Web server.

Example: /etc/httpd/httpd.conf

Example: /usr/local/apache2/conf/httpd.conf

Example: c:\Program files\apache group\apache\conf\httpd.conf

Config file path ('none' to skip web server setup):

> type /etc/apache2/apache2.conf

-----> Check and complete web server config file '/etc/apache2/apache2.conf'

All AWStats directives are already present.

-----> Update model config file '/var/www/awstats/wwwroot/cgi-bin/awstats.model.conf'

File awstats.model.conf updated.

-----> Need to create a new config file ?

Do you want me to build a new AWStats config/profile

file (required if first install) [y/N] ? press y

-----> Define config file name to create

What is the name of your web site or profile analysis ?

Example: www.mysite.com

Example: demo

Your web site, virtual server or profile name:

> type the name of website or profile eg; lbjt,insken,bankrakyat etc..

-----> Define config file path

In which directory do you plan to store your config file(s) ?

Default: /etc/awstats

Directory path to store config file(s) (Enter for default):

> Just press Enter here

-----> Create config file '/etc/awstats/awstats.lbjt.conf'

Config file /etc/awstats/awstats.lbjt.conf created.

-----> Add update process inside a scheduler

Sorry, configure.pl does not support automatic add to cron yet.

You can do it manually by adding the following command to your cron:

/var/www/awstats/wwwroot/cgi-bin/awstats.pl -update -config=lbjt

Or if you have several config files and prefer having only one command:

/var/www/awstats/tools/awstats_updateall.pl now

Press ENTER to continue... Just press Enter here

A SIMPLE config file has been created: /etc/awstats/awstats.lbjt.conf

You should have a look inside to check and change manually main parameters.

You can then manually update your statistics for 'lbjt' with command:

> perl awstats.pl -update -config=lbjt

You can also read your statistics for 'lbjt' with URL:

> http://localhost/awstats/awstats.pl?config=lbjt

Press ENTER to finish... Just press Enter here


Step 4

awstats@ubuntu:/var/www/awstats/tools$ type sudo pico /etc/awstats/awstats.lbjt.conf

** To find the value that need to be edited as represent by the red colour below, simply press the “Page Down” button on the keyboard **

# If there are several log files from load balancing servers :

# Example: "/pathtotools/logresolvemerge.pl *.log |"

#

LogFile="/var/log/apache2/lbjt.skali.my-access_log" change to this from default “/var/log/httpd/mylog.log”

# LogFormat = 1

# LogFormat = "%host %other %logname %time1 %methodurl %code %bytesd %refererqu$

#

# Example for IIS:

# LogFormat = 2

#

LogFormat=4 change to this value from default “ 1 ”

# If analyzing mail log, enter here the domain name of mail server.

# Example: "myintranetserver"

# Example: "www.domain.com"

# Example: "ftp.domain.com"

# Example: "domain.com"

#

SiteDomain="lbjt" make sure this is value is entered

# Example: "/var/lib/awstats"

# Example: "../data"

# Example: "C:/awstats_data_dir"

# Default: "." (means same directory as awstats.pl)

#

DirData="/var/www/awstats" change to this from the default “/var/lib/awstats”


Step 4

awstats@ubuntu:/var/www/awstats/tools$ type sudo /var/www/awstats/wwwroot/cgi-bin/awstats.pl config=lbjt -update

Create/Update database for config "/etc/awstats/awstats.lbjt.conf" by AWStats version 6.9 (build 1.925)

From data in log file "/var/log/apache2/lbjt.skali.my-access_log"...

Phase 1 : First bypass old records, searching new record...

Searching new records from beginning of log file...

Phase 2 : Now process new records (Flush history on disk after 20000 hosts)...

Jumped lines in file: 0

Parsed lines in file: 1788

Found 0 dropped records,

Found 0 corrupted records,

Found 0 old records,

Found 1788 new qualified records.

awstats@ubuntu:/var/www/awstats/tools$

Step 5

Open browser using Internet Explorer or Mozilla FireFox. At the URL address type the below address;

http://192.168.19.50/awstats/awstats.pl?config=lbjt and the web page as below will be displayed and your awstats configuration is successful. Replace the lbjt name with other website profile. Let say if you are creating a profile for Bank Rakyat, then type, bankrakyat after config= (eg; config=bankrakyat) and so on for other profile.

Wednesday, April 15, 2009

PFSense: Basic Installation Tutorial for Dummies Like Me :-)

Taken from PFSense website :-)

Welcome to the home page of the pfSense project!

pfSense is a free, open source customized distribution of FreeBSD tailored for use as a firewall and router. In addition to being a powerful, flexible firewalling and routing platform, it includes a long list of related features and a package system allowing further expandability without adding bloat and potential security vulnerabilities to the base distribution. pfSense is a popular project with more than 1 million downloads since its inception, and proven in countless installations ranging from small home networks protecting a PC and an Xbox to large corporations, universities and other organizations protecting thousands of network devices.

This project started in 2004 as a fork of the m0n0wall project, but focused towards full PC installations rather than the embedded hardware focus of m0n0wall. pfSense also offers an embedded image for Compact Flash based installations, however it is not our primary focus.

Click here for details


This simple tutorial is based on my experience. This software is awesome with a lot of features in it. The main reason I'm installing this software is for creating a Squid proxy server. Since this software have a lot of add-on so why not I'm trying to install it. Actually, I had installed this PFSense in my SUN VirtualBox. On the moment I'm posting this post, I'm using the latest PFSense version 1.2.2. To download the software click here


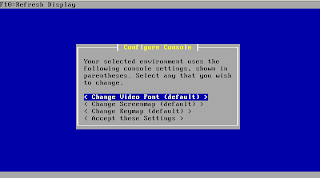
Configure Console > Choose "Change Video Font (Default)"


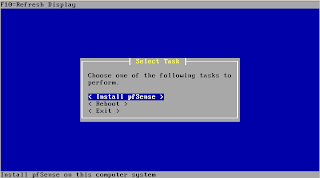
Select Task > Choose "Install pfSense"


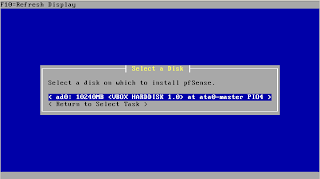
Select Disk > Select your desired disk, default is "ad0"


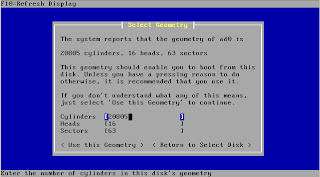
Select Geometry > I didn't change anything here, just proceed with the default, "choose Use this Geometry"


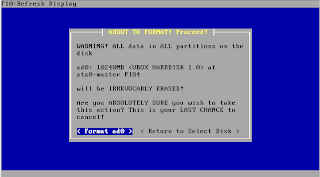
ABOUT TO FORMAT! Proceed? > Verified it first and then "choose Format ad0"


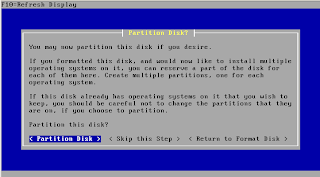
Partition Disk? > Read this first and choose Partition Disk if you satisfied :)


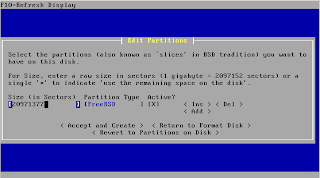
Edit Partitions > I'm using this default and choose Accept and Create


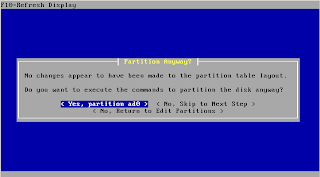
Partitions Anyway? > "Choose Yes, partition ad0"


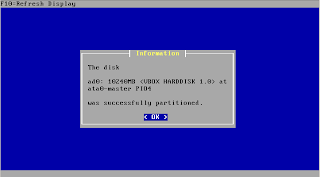
Information > The disk was successfully partitioned, ahaaaa OK


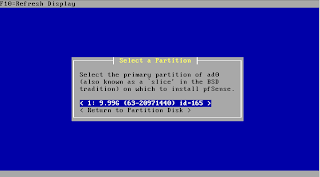
Select Partition > Select the primary partition, I choose 1:blablabla ;)


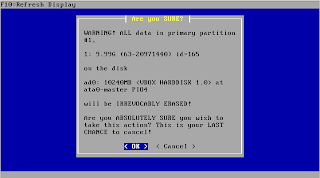
Are you SURE? Choose OK if you dare to format your disk


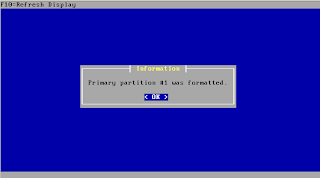
Information > Primary partition #1 was formatted.


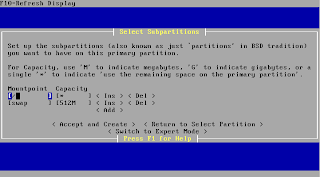
Select Subpartitions > I'm just selecting the default as below. Choose Accept and Create


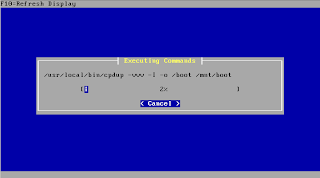
Executing Commands


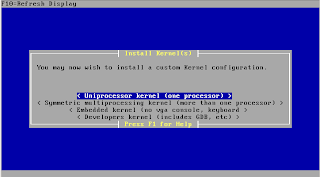
Install Kernel > Choose Uniprocessor kernel (one processor) if your system has only one processor. But, if you installed it on server maybe you should choose Symmetric multi processing blablabla


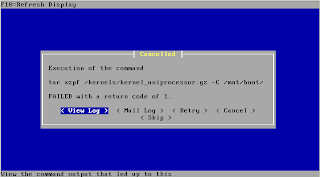
Cancelled? What the heck? I dont know why this happen but I Retry it and it works!!! Yeaa!


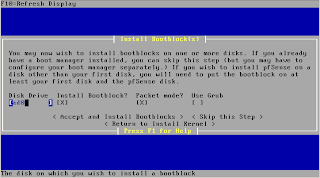
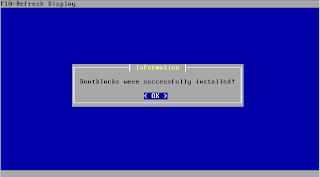
Install Bootblocks > I don't want headache so, I just keep the default and choose Accept and Install Bootblocks


Information > Bootblocks were successfully installed


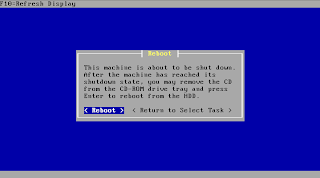
Reboot > Choose Reboot


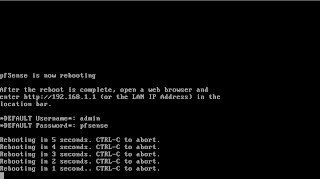
Reboot, bip! bip! will hear the bip bip sound


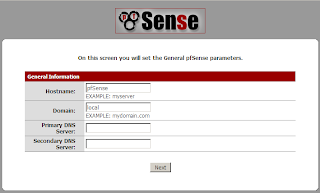
Open up the web browser FireFox or IE. Enter the default PFSense IP Address, 192.168.1.1, Username: admin and Password: pfsense to get to the page as below


General Information


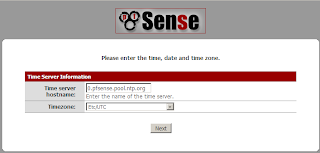
Time Server Information


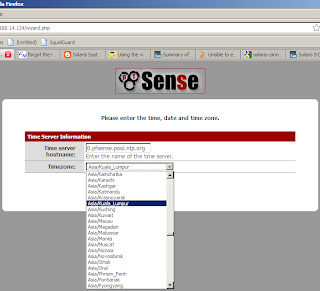
Time Server Information, choose Timezone


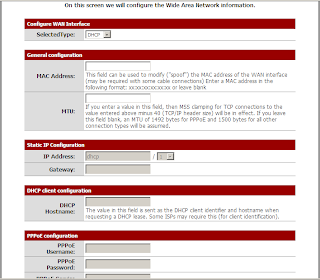
Configure WAN interface, I'm using DHCP at first.


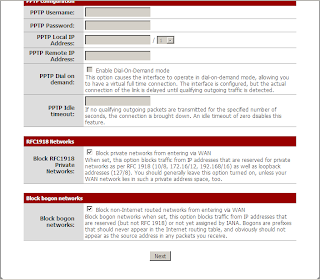
Contd..


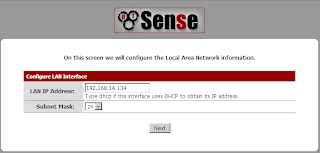
Configure LAN Interface


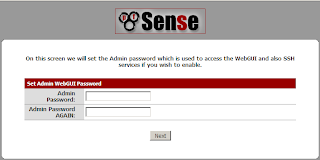
Set Admin WebGUI Password


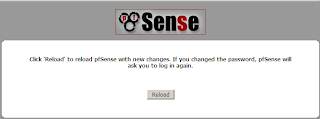
Reload, click Reload button


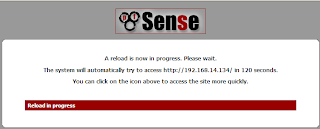
A reload is now in progress. Please wait but if unpatient click on PFSense icon :-P


System Overview page

Linux News Of The Day!

Powered By
widgetmate.com
Sponsored By
Credit Card Forum